This post is about using an Ubuntu install as a router. I will be using it as a VM in Hyper-V ( 8gb ram 6 cores 40gb hdd) for a home router. The configuration is straightforward. I will post links for pertinent content.
Ubuntu Server Download:
https://ubuntu.com/download/server
Ubuntu Server Installation:
https://ubuntu.com/server/docs/installation
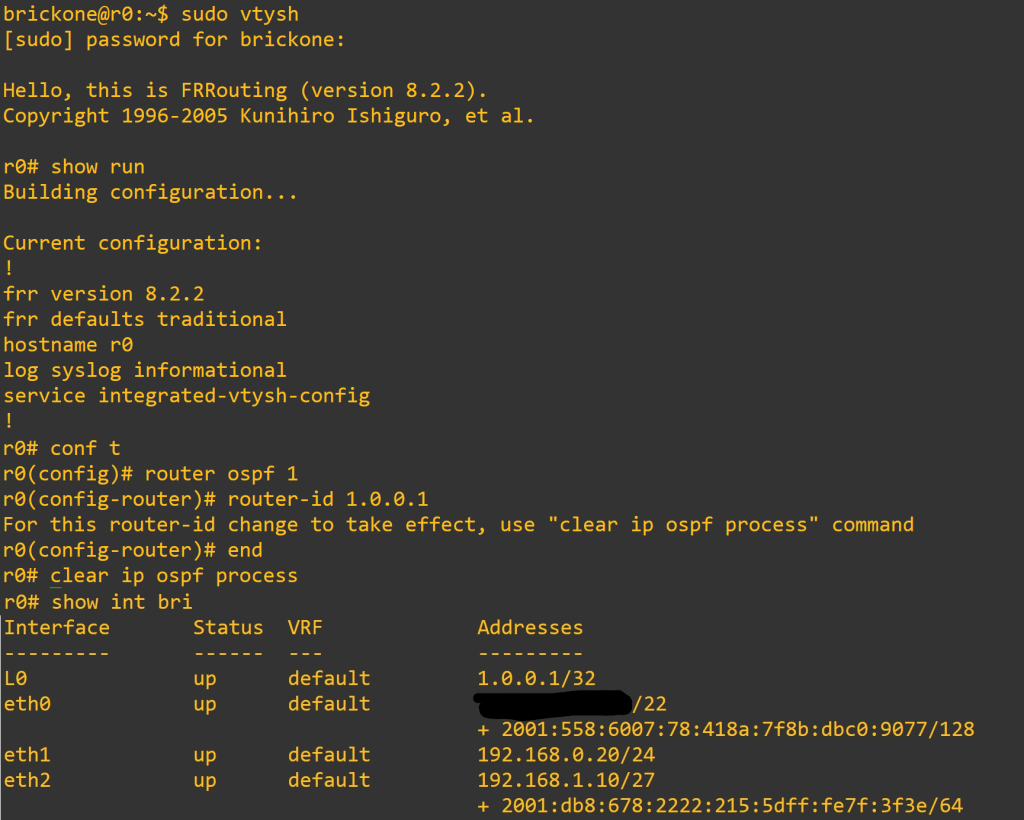
Once we have the operating system installed. We need to make a few changes. I like to use Ubuntu routers in my lab. We will configure a loopback, isc-dhcp-server, Bind, install free range routing, set up NAT and port forwarding. It is ideal to add a public key to the server for more secure SSH logins. I bring down a key from GitHub during installation.
# Completely optional.
Add public key to GitHub account:
# to manually turn off password authentication
https://www.linuxbabe.com/linux-server/setup-passwordless-ssh-login
#Configure Loopback – also optional
#Create script to create loopback on system startup. The loopback created will not be persistent through system restarts. We will also add the configuration to netplan.
#Create script – you can put it whatever directory you like. For simplicity we are putting it in the #home folder. Typing in pwd and pressing enter should give you your current working directory.
#You can also place the scripts in a directory listed in the PATH environment variable. You can also add a path by editing the /etc/profile for global or .bashrc for user specific. add export PATH=”/path:$PATH” at the bottom of the file.

~ means home directory
brickone@r0:~$ pwd
/home/brickone
sudo touch L0.sh
sudo vi L0.sh or nano L0.sh <- You can use whichever editor you like
#!/bin/sh
ip link add name L0 type dummy <– Creates dummy interface
ip link set L0 up <– Puts dummy interface in up state
:wq (vim) or ctrl+w ctrl+x (nano)

Sudo chmod 0755 L0.sh <– assign proper permissions, if you forget this step service will show failed. Check failed services with:
Systemctl –failed
sudo touch /etc/systemd/system/L0.service <– Create service file
sudo vi /etc/systemd/system/L0.service <– Edit service file
[Unit]
Description=Bring up L0 on system boot
After=network.target
[Service]
ExecStart=/home/brickone/L0.sh
[Install]
WantedBy=multi-user.target

#Link to network.target information:
https://www.freedesktop.org/wiki/Software/systemd/NetworkTarget/
sudo systemctl start L0 <– Start our newly created service
sudo systemctl enable L0 <– Enable the service to start on system startup
# We can also run the script now if you don’t want to wait for a restart.
Sudo bash L0.sh
# edit netplan to add address to L0. Depending on your interface setup your file may differ. I am # going off the setup of DHCP client outside interface. Pressing tab to autocomplete file names # will assist you in finding your netplan file. For the isc-dhcp-server we need a interface in each # subnet we plan to serve. If you only plan to serve one subnet, you will be fine with just one # inside interface. If you plan on service multiple subnets, it will depend on your setup.
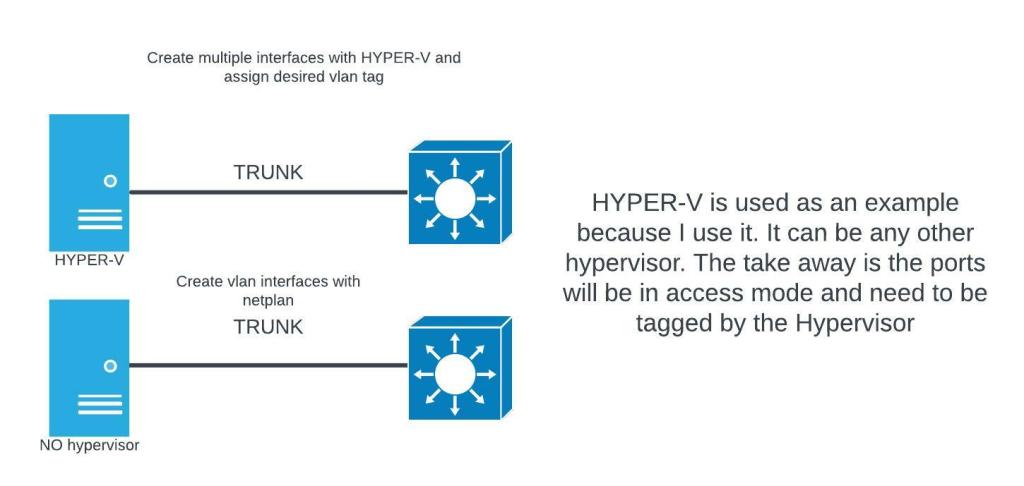
# Hyper-v vlan-id

ls /etc/netplan/
sudo vi /etc/netplan/00-installer-config.yaml

# netplan vlan-id interface
network:
version: 2
ethernets:
eth4:
addresses:
– 192.168.1.131/27
gateway4: 192.168.1.129
nameservers:
addresses:
– 192.168.1.14
search:
– technician-lee.net
vlans:
vlan.10: <– interface name
id: 10 <– interface vlan tag
link: eth4 <– physical interface
addresses: [10.0.0.254/24] <– vlan interface ip address
# If you are using a hypervisor the virtual switch only operates in access mode
# That means if the virtual switch isn’t tagging the frames, they will be dropped.
# apply configuration with
Sudo netplan apply
# netplan is well at pointing out errors. Indentation is important for yaml files.
# you cannot have multiple default gateways.
# If you have trouble getting a DHCP address on your outside interface you may have to call your #ISP.
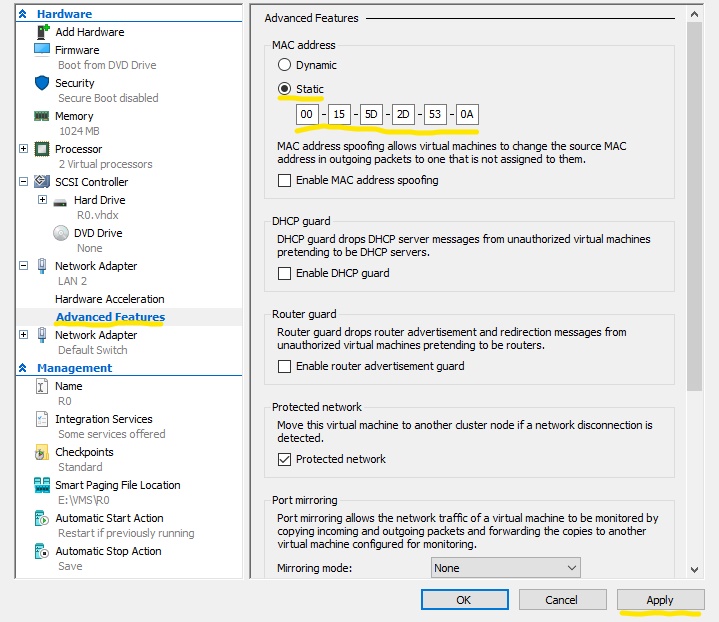
#Each ISP has different settings for port security. In my case I just used Hyper-V to clone the #outside interface address of my Cisco 1941.
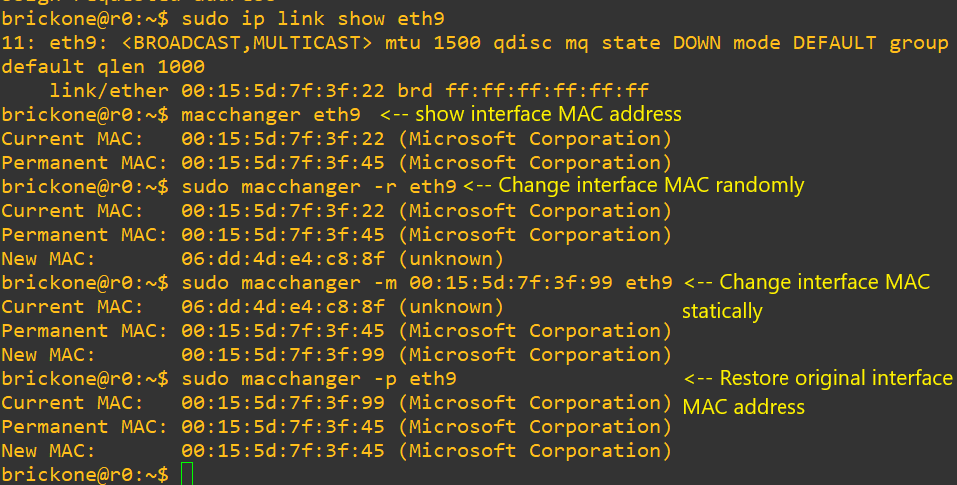
#Another option is to use macchanger. Here is the man page
http://manpages.ubuntu.com/manpages/bionic/man1/macchanger.1.html
sudo macchanger -m 00:00:00:00:00:00 eth0 <– enter desired mac and interface
#If changes do not persist between reboots, just create a script with the above command.
# FRR can be installed from source or from apt
# from apt
# add GPG key
curl -s https://deb.frrouting.org/frr/keys.asc | sudo apt-key add -
# possible values for FRRVER: frr-6 frr-7 frr-8 frr-stable
# frr-stable will be the latest official stable release
FRRVER="frr-stable"
echo deb https://deb.frrouting.org/frr $(lsb_release -s -c) $FRRVER | sudo tee -a /etc/apt/sources.list.d/frr.list
# update and install FRR
sudo apt update && sudo apt install frr frr-pythontools
NOTE: To revert to FRR version 8.1 or 8.0, please replace frr with frr8.0 or frr8.1 in the sources url above.
For example to revert to FRR 8.1, use: deb.frrouting.org/frr8.1
# from source – takes much longer, but is recommended
sudo apt update
sudo apt-get install \
git autoconf automake libtool make libreadline-dev texinfo \
pkg-config libpam0g-dev libjson-c-dev bison flex \
libc-ares-dev python3-dev python3-sphinx \
install-info build-essential libsnmp-dev perl \
libcap-dev python2 libelf-dev libunwind-dev -y
sudo curl https://bootstrap.pypa.io/pip/2.7/get-pip.py –output get-pip.py
sudo python2 ./get-pip.py
sudo apt install libpcre2-dev -y
sudo apt install pcre2* -y
sudo apt install cmake -y
sudo git clone https://github.com/CESNET/libyang.git
cd libyang
sudo git checkout v2.0.0
sudo mkdir build; cd build
sudo cmake -D CMAKE_INSTALL_PREFIX:PATH=/usr \
-D CMAKE_BUILD_TYPE:String=”Release” ..
sudo make
sudo make install
sudo apt-get install protobuf-c-compiler libprotobuf-c-dev -y
sudo apt-get install libzmq5 libzmq3-dev -y
sudo groupadd -r -g 92 frr
sudo groupadd -r -g 85 frrvty
sudo adduser –system –ingroup frr –home /var/run/frr/ \
–gecos “FRR suite” –shell /sbin/nologin frr
sudo usermod -a -G frrvty frr
sudo git clone https://github.com/frrouting/frr.git frr
cd frr
sudo ./bootstrap.sh
sudo ./configure \
–prefix=/usr \
–includedir=\${prefix}/include \
–bindir=\${prefix}/bin \
–sbindir=\${prefix}/lib/frr \
–libdir=\${prefix}/lib/frr \
–libexecdir=\${prefix}/lib/frr \
–localstatedir=/var/run/frr \
–sysconfdir=/etc/frr \
–with-moduledir=\${prefix}/lib/frr/modules \
–with-libyang-pluginsdir=\${prefix}/lib/frr/libyang_plugins \
–enable-configfile-mask=0640 \
–enable-logfile-mask=0640 \
–enable-snmp=agentx \
–enable-multipath=64 \
–enable-user=frr \
–enable-group=frr \
–enable-vty-group=frrvty \
–with-pkg-git-version \
–with-pkg-extra-version=-MyOwnFRRVersion
sudo make
sudo make install
sudo install -m 775 -o frr -g frr -d /var/log/frr
sudo install -m 775 -o frr -g frrvty -d /etc/frr
sudo install -m 640 -o frr -g frrvty tools/etc/frr/vtysh.conf /etc/frr/vtysh.conf
sudo install -m 640 -o frr -g frr tools/etc/frr/frr.conf /etc/frr/frr.conf
sudo install -m 640 -o frr -g frr tools/etc/frr/daemons.conf /etc/frr/daemons.conf
sudo install -m 640 -o frr -g frr tools/etc/frr/daemons /etc/frr/daemons
sudo vi /etc/sysctl.conf
# Uncomment the next line to enable packet forwarding for IPv4
net.ipv4.ip_forward=1
# Uncomment the next line to enable packet forwarding for IPv6
# Enabling this option disables Stateless Address Autoconfiguration
# based on Router Advertisements for this host
net.ipv6.conf.all.forwarding=1
# Enable MPLS Label processing on all interfaces
net.mpls.conf.eth0.input=1
net.mpls.conf.eth1.input=1
net.mpls.conf.eth2.input=1
net.mpls.platform_labels=100000
sudo vi /etc/modules-load.d/modules.conf
# Load MPLS Kernel Modules
mpls_router
mpls_iptunnel
sudo modprobe mpls-router mpls-iptunnel
sudo install -m 644 tools/frr.service /etc/systemd/system/frr.service
sudo sysctl -p
sudo systemctl enable frr
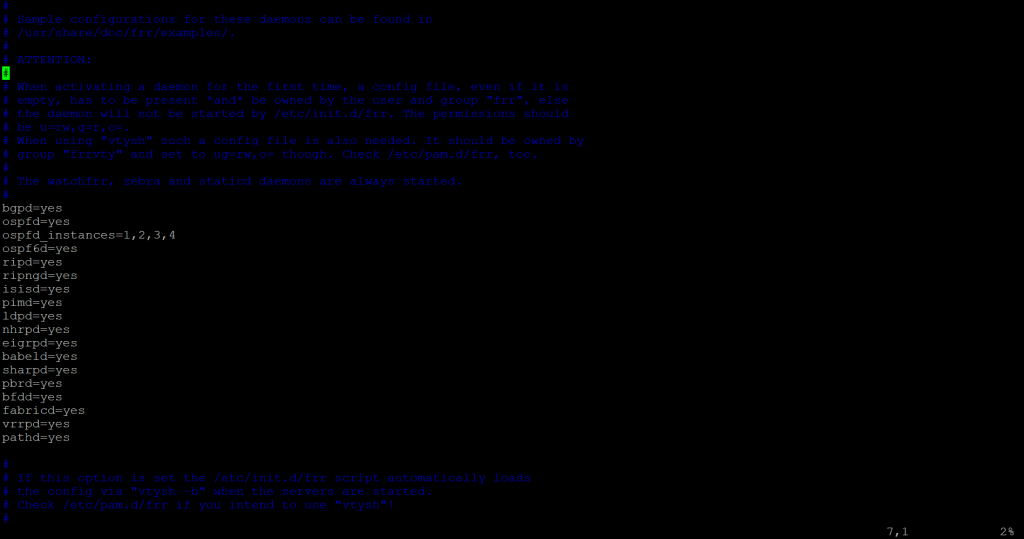
sudo vi /etc/frr/daemons
#enable daemons by changing no to yes
sudo systemctl start frr
# Once frr is installed we need to enable daemons we want to use. You can manually edit or use sed, however it gets done is okay.
# sed example https://linux.die.net/man/1/sed <– sed man page
Sudo sed -i’.bak’ ‘s/no/yes/g’ /etc/frr/daemons <– -i makes changes to document. Adding ‘word’ #makes a copy of the original.
# You login with
sudo vtysh
# the commands are very familiar if you have used the cisco command line before
# you can set enable and line passwords. Check out the FRR documentation for more info
# https://docs.frrouting.org/en/latest/
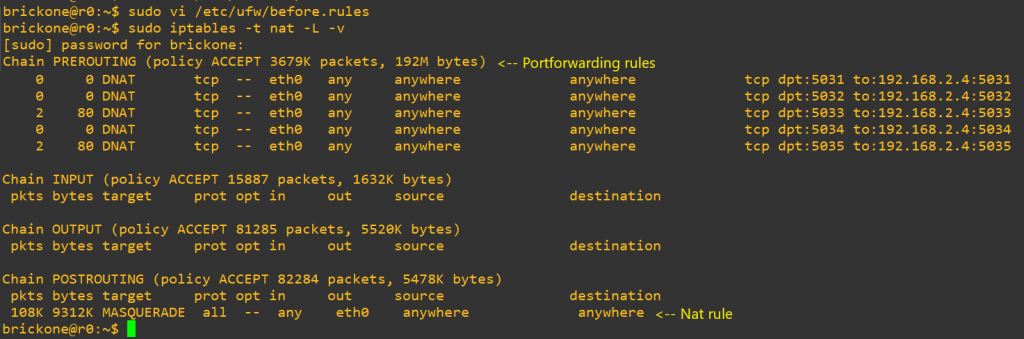
Now we will setup our NAT and if needed port forwarding. I say only if needed because ideally if you just want to access resources on your private network remotely a VPN would be a more secure option. But port forwarding is fine, let’s just be mindful of the ports we are opening and why. We will also need to make another script for a router to work.
# First let’s add the needed configuration changes
Sudo vi /etc/ufw/sysctl.conf
# Uncomment this to allow this host to route packets between interfaces
net/ipv4/ip_forward=1
net/ipv6/conf/default/forwarding=1 <– Optional
net/ipv6/conf/all/forwarding=1 <– Optional
sudo vi /etc/default/ufw
# Set the default forward policy to ACCEPT, DROP or REJECT. Please note that
# if you change this you will most likely want to adjust your rules
DEFAULT_FORWARD_POLICY=”ACCEPT”

# Now to add our rules, we will need the name of the outside interface
Sudo vi /etc/ufw/before.rules
# NAT table rules
*nat
:PREROUTING ACCEPT [0:0]
:POSTROUTING ACCEPT [0:0]
-F <– clear table when reloading, otherwise there will be duplicate rules
# Port Forwarding
-A PREROUTING -i eth0 -p tcp –dport 22 -j DNAT –to-destination 192.168.1.10 <– change to your needs
# Forward traffic through eth0 – Change to match you outside-interface
-A POSTROUTING -s 192.168.1.0/24 -o eth0 -j MASQUERADE
# -s 0.0.0.0/0 means any, you can specify a specific subnet or host.
# don’t delete the ‘COMMIT’ line or these nat table rules won’t
# be processed
COMMIT
# to load rules
# the firewall needs to be reloaded after changes and reboots.
Sudo ufw disable && sudo ufw enable Sudo iptables –t nat –L -v
# After you verify connectivity, the next steps are super optional. You can run these services on # the same box or other boxes. However you do it is fine.
# We do need to open some ports up. How specific you are is up to you
https://www.digitalocean.com/community/tutorials/ufw-essentials-common-firewall-rules-and-commands
Sudo ufw allow ssh
Sudo ufw allow 224.0.0.0/8
Sudo ufw allow 53
Sudo ufw allow 67:68/udp
# Script for ufw repeats the process from earlier with minor changes
sudo touch UFW.sh
sudo vi UFW.sh
#!/bin/sh
ufw disable
ufw enable
sudo chmod 0755 /home/brickone/UFW.sh
sudo touch /etc/systemd/system/UFW.service
sudo vi /etc/systemd/system/UFW.service
[Unit]
Description=Restart ufw
After=network.target
[Service]
ExecStart=/home/brickone/UFW.sh
[Install]
WantedBy=multi-user.target
sudo systemctl start NET-UP
sudo systemctl enable NET-UP
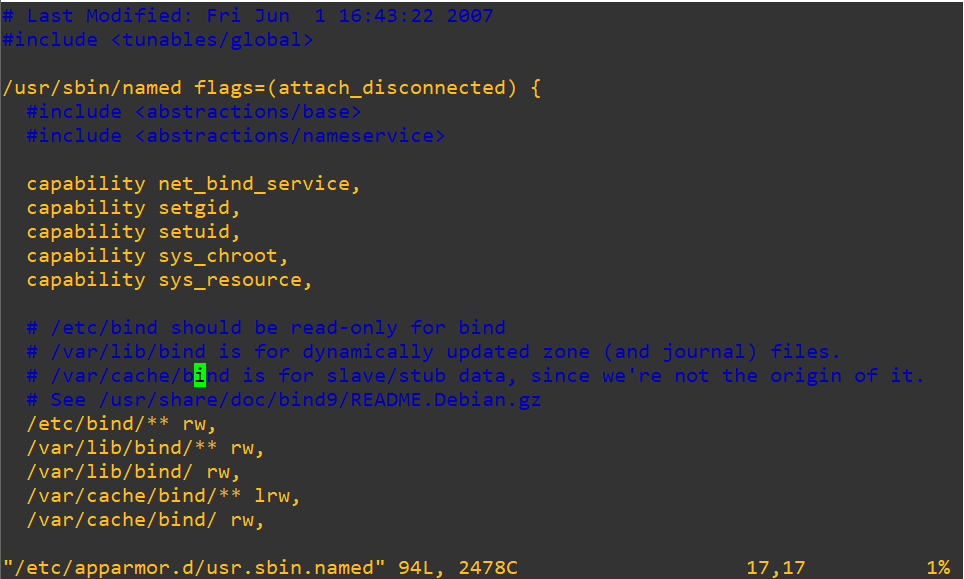
# Install bind
sudo apt install -y bind9 bind9utils bind9-doc dnsutils
# Bind documentaion
https://bind9.readthedocs.io/en/latest/index.html
# edit named.conf.options
sudo vi /etc/bind/named.conf.options

# edit named.conf.local
Sudo vi /etc/bind/named.conf.local
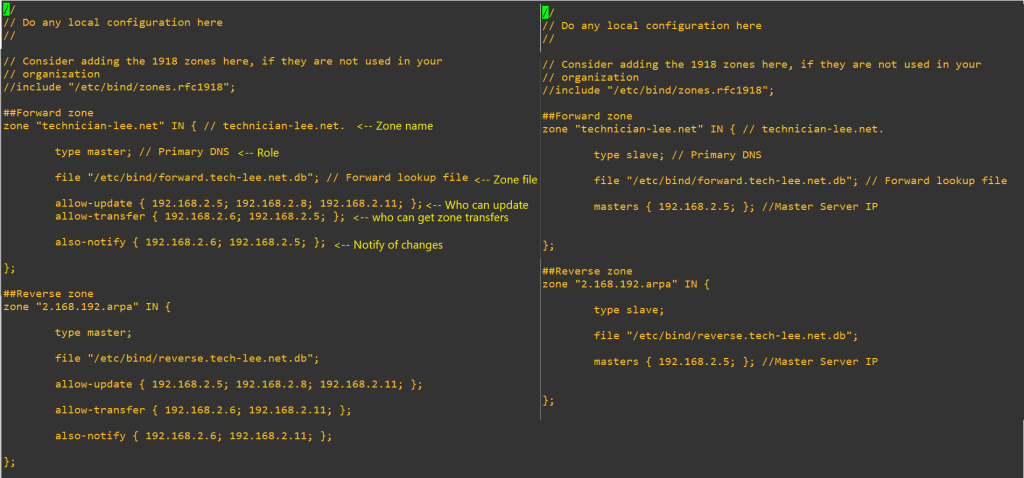
# create our zone files.
Cd /etc/bind/
Sudo cp db.empty forward.db ß Name must match what you put as the file for Zone you added in named.conf.local. For example my file is called forward.tech-lee.net.db
Sudo vi forward.db
; zone file for your domain
$TTL 86400
$ORIGIN your domain
@ IN SOA server.yourdomain. email.yourdomain. (
2021070330 ; Serial ß needs to be incremented when changes are made
604800 ; Refresh
86400 ; Retry
2419200 ; Expire
86400 ) ; Negative Cache TTL
; Name server for this domain
@ IN NS server.yourdomain. <– your dns server your are creating this on
IN NS secondary-server.yourdomain. <– other dns servers in your domain
; Mail server for this domain. A small number (10) indicators higher priority
; A records host records for ipv4
DNS-PRIMARY IN A 192.168.2.5
DNS-SECONDARY IN A 192.168.2.6
R0 IN A 10.0.0.2
R0-1 IN A 192.168.3.254
R1 IN A 192.168.0.1
R4 IN A 192.168.3.2
R5 IN A 192.168.4.2
# Now the reverse zone. You need a different reverse zone for each subnet.


Sudo cp db.127 reverse.db
Sudo vi reverse.db
$TTL 86400
$ORIGIN Zone name.
@ IN SOA server.yourdomain. server.yourdomain. (
2021070322 ; Serial
604800 ; Refresh
86400 ; Retry
2419200 ; Expire
86400 ) ; Negative Cache TTL
; Name server for this domain
@ IN NS server.yourdomain.
IN NS seconry-server.yourdomain.
; PTR Records
12.20 IN PTR MLSW1.technician-lee.net. ; 192.168.0.2
100.100 IN PTR R1.technician-lee.net ; 192.168.0.1
101.101 IN PTR MLSW2.technician-lee.net ; 192.168.0.6
# now we need to reload and enable
Sudo systemctl start named <– if it isn’t started
Sudo systemctl restart named <– if it was already started
Sudo systemctl enable named <– So it will start on boot if the slave server has trouble writing files check the permission in the file below
# isc-dhcp-server documentation
https://kb.isc.org/docs/isc-dhcp-44-manual-pages-dhcpd
https://kb.isc.org/docs/aa-00502
https://kb.isc.org/docs/isc-dhcp-44-manual-pages-dhcp-options
# the dhcp server is more straight forward
sudo apt-get install isc-dhcp-server
sudo vi /etc/dhcp/dhcp.conf
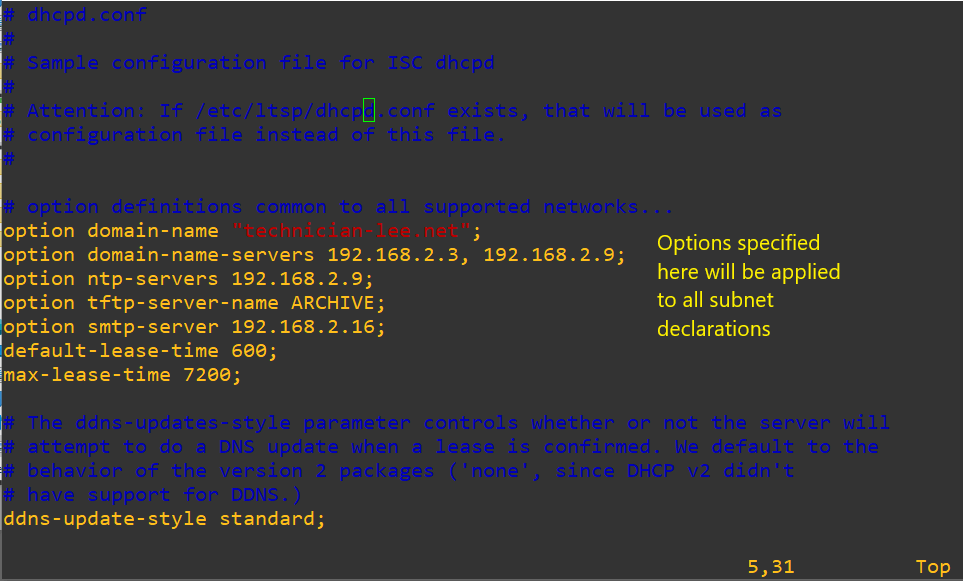
# subnet declarations
subnet 192.168.1.128 netmask 255.255.255.224 { <– the subnet
interface eth3; ß the interface you configure for the specified subnet
range 192.168.1.130 192.168.1.158; <– range of addresses
option domain-name-servers 192.168.1.14; <– these options override the global options
option domain-name “technician-lee.net”; <– search domain
option subnet-mask 255.255.255.224; <– subnet mask
option routers 192.168.1.129; <– Default-router, can be multiple
option broadcast-address 192.168.1.159; <– broadcast of subnet
default-lease-time 3600;
max-lease-time 7200;
}
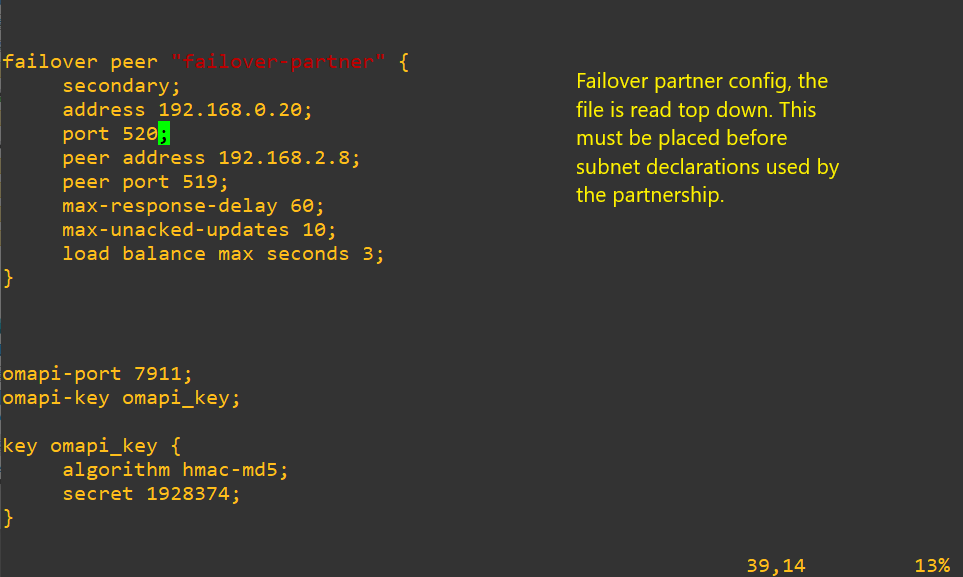
subnet 192.168.1.128 netmask 255.255.255.224 {
interface eth3;
option domain-name-servers 192.168.1.14;
option domain-name “technician-lee.net”;
option subnet-mask 255.255.255.224;
option routers 192.168.1.129;
option broadcast-address 192.168.1.159;
default-lease-time 3600;
max-lease-time 7200;
pool {
failover peer “failover-partner:’
range 192.168.1.35 192.168.1.62
}

# then we just need to reload and hope no error show up
# if they did it will be easy to fix. Remember tab is your friend
Sudo journalctl –xe
Sudo systemctl status isc-dhcp-server
# quick ntp configuration server config first
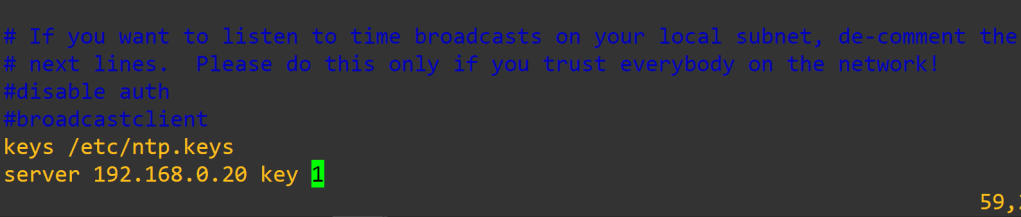
sudo apt install ntp -y
sudo vi /etc/ntp.conf


sudo vi /etc/ntp.keys

Sudo service ntp restart
Sudo ufw allow ntp
# client ntp configuration
sudo apt install ntpdate
sudo ntpdate your-network-ntp-server <– sync clock with ntp server
sudo timedatectl set-ntp off
sudo apt install ntp -y
sudo vi /etc/ntp.conf

sudo vi /etc/ntp.keys

sudo systemctl restart ntp
ntpq -p
Now you have an awesome home router. There will be links at the bottom for additional information and some idea of performance. Thank you for your time.
Links:
https://speedify.com/blog/internet-speed/raspberry-pi-vs-odroid-fast-wired-ethernet-router
https://atoonk.medium.com/linux-kernel-and-measuring-network-throughput-547c3b68c4d2
https://ubuntu.com/server/docs/network-dhcp
https://ubuntu.com/server/docs/network-ntp
https://elegantnetwork.github.io/posts/comparing-open-source-bgp-stacks/
