OSPF IP Protocol 89 Overview

OSPF Router-id – 32-bit unique identifier of OSPF processes running on the router. OSPF process router-id selection criteria:

  1. Use the router ID configured with router-id command in router process
  2. Uses the highest non-shutdown ipv4 loopback address
  3. Use the highest non-shutdown ipv4 configured interface address

-Multiple OSPF processes will skip addresses used by other OSPF  processes on the device

-The RID configured with the router-id command will never change. A RID acquired by the process picking an interface address will change if the process restarts and the previous criteria has changed.

-The RID can be changed with either the router-id command, or altering interface addresses or states. Then restarting the OSPF process with the clear ip OSPF process exec command.

OSPF Messages

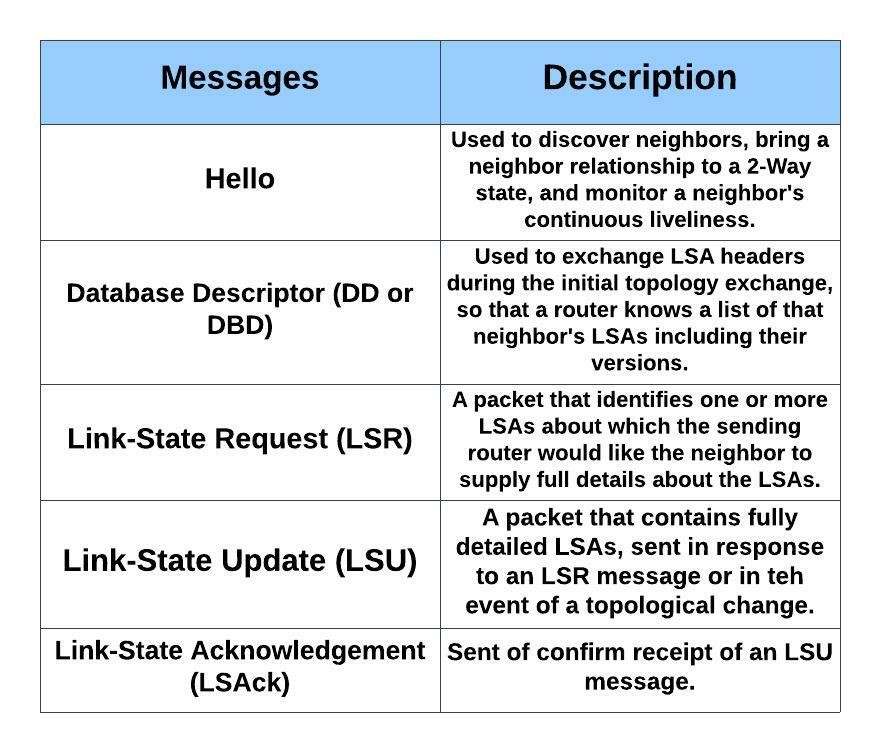
-LSAs are not OSPF messages. An LSA is a data structure, held inside a router’s LSDB and exchanged inside LSU messages.

OSPF Neighbor States

-Neighbors – Two routers that share a common data link and that exchange hello messages, and the hellos must match for certain parameters. (2-way/Drother)

-Adjacent (Fully Adjacent) – Two neighbors that have completed the process of fully exchanging DD and LSU packets directly between each other. (DR/BDR)

-Hello messages, 224.0.0.5/FFO2::5/ALLSPFROUTERS, 224.0.0.6/FF02::6/ALLDESIGNATEDROUTES

  • Discover other OSPF-speaking routers on common subnets
  • Check for agreement on selected configuration parameters
  • Verify bidirectional visibility between routers
  • Monitor health of the neighbors to react if the neighbor fails
  • Hellos are sourced from primary IP address on the enabled interface

-Hello Message Parameter Checks

  • Authentication must match
  • Subnet mask must match
  • Area must match
  • Area type must match
  • RIDs must be unique
  • Hello and Dead Timers must match

-MTU mismatch would affect database synchronization in the ExStart and Exchange phases. Routers can still become 2-Way neighbors successfully.

-Nat can affect this as well. If you run into issues check the range of your Nat statement.

Designated Router – DR/BDR

The DR/BDR are responsible for the flooding of LSUs. On a multi-access segment all routers are Fully adjacent with the DR & BDR. The DR also generates type 2 LSAs which represents the subnet and the router interfaces connected to the subnet.

Criteria for DR/BDR election:

  1. Interface OSPF priority of 1-255 (0 excludes the router interface from participating in a DR/BDR election).
  2. Highest router-id

-The DR/BDR position cannot be preempted. For instance, if a router is added to the segment with a higher router-id or priority. Current DR/BDR would have to be reset for another election to take place. If the DR goes down the BDR takes over. Then an election for a new BDR would be held.

– On multi-access segments, updates are sent to 224.0.0.6. Then the DR floods the LSUs with updated LSAs within the area. The LSU flooded by the DR serves as an acknowledgment to the original sending router that it was received. All routers except the originating router will acknowledge the flooded LSU with a unicast LSAck to the DR.

OSPF Network Types

-Broadcast Multi-access: Broadcast networks are capable of connection more than two devices. Broadcasts sent out one interface are capable of reaching all devices on the segment.

Router(config-if)# ip ospf network broadcast

-Non-Broadcast Multi-access: Frame Relay, ATM, and X.25 are considered non-broadcast multi-access, in that they can connect more than two devices, and broadcasts sent out one interface might not always be capable of reaching all the interfaces attached to a segment.

Router(config-if)# ip ospf network non-broadcast

-Point-to-Point: Allows only two devices to communicate. Point-to-Point circuits do not use ARP, and broadcast traffic does not become the limiting factor. Default for serial interfaces (HDLC or PPP encapsulation), GRE and Point-to-Point frame relay subinterfaces.

Router(config-if)# ip ospf network point-to-point

-Point-to-Multipoint: Not enabled by default on any medium. Supports hub-and-spoke connectivity while using the same IP subnet and is commonly found in frame relay and L2VPN topologies. Interfaces enabled for OSPF point-to-multipoint, add the interface’s IP to the LSDB as /32. Routes advertised out that interface will change the next-hop to the interfaces IP address.

Router(config-if)# ip ospf network point-to-multipoint

-Loopback: Can only be used on loopback interfaces. This network type indicates the address will always be advertised as a /32 prefix length. Changing the network type on the interface changes this behavior. The loopback network type cannot be manually assigned.

LSA TYPES

  1. Router – One per router, per area, listing the router’s RID and all interface IP address in that area. Represents stub networks as well. Flooded only within its area of origin.
  2. Network – One per transit network. Created by the DR on the subnet, and represents the subnet and the router interfaces connected to the subnet. Flooded only within it are of origin.
  3. Net Summary – Created by ABRs to represent networks present in one are when being advertised into another are. Defines the subnets in the origin are, and cost, but no topology data. Flooded only within its area of origin; re-originated on ABRs.
  4. ASBR Summary – Like a type 3 LSA, except it advertises a host route used to reach an ASBR. Flooded only within its area of origin; re-originated on ABRs.
  5. AS External – Created by ASBRs for external routes injected into OSPF. Flooded to all regular areas.
  6. Group Membership Defined for MOSPF, not supported by Cisco IOS.
  7. NSSA External – Created by ASBRs inside an NSSA, instead of a type 5 LSA. Flooded only within its area of origin; converted to type 5 LSA on an ABR toward other areas.
  8. External Attributes – Created by ASBRs during BGP-to-OSPF redistribution to preserve BGP attributes of redistributed networks. Not implemented in Cisco routers.

9-11. Opaque – Used as generic LSAs to allow for easy future extension of OSPF; for example, type 10 has been adapted for MPLS traffic engineering. These LSAs have different flooding scope: Type 9 has link-local flooding scope, type 10 has area-local flooding scope, type 11 has autonomous system flooding scope equivalent to the flooding scope of type 5 LSAs ) not flooded into stubby areas and NSSAs).

Router Types:

  • ABR: Arouter that has one interface in area 0 and other interfaces in non-zero areas. The ABR can filter routes, as well as summarize routes. Routers in an area have a complete view of the area. As they have identical LSDBs for that area. The ABR is responsible for flooding type 3 LSAs into the area.Two important rules in OSPF ABR functionality:
  • Only intra-area routes are translated into type 3 LSAs and flooded into the backbone area. Both intra-area and inter-area routes from the backbone are translated into type 3 LSAs, then flooded to non-backbone areas.
  • When an ABR runs SPF algorithm it ignores all type 3 LSAs received from non-backbone areas. This ensures that an ABR does not traverse a non-backbone area to reach a network that is located in the backbone or in some other non-backbone area.
  • ASBR: A router that injects routes originating outside the OSPF domain. ASBRs are also a point of filtering and summarization for injected routes. A router can be both an ASBR and ABR. Ex- A router injects a default route. (In normal areas, an injected default route is a type 5 LSA)

Area Types:

  • Normal Area: Allows the flooding of all LSA types.
  • Backbone Area: A special area that all ABRs must connect to. Type 3 LSAs must pass through this area to be accepted by a non-originating ABR.
  • Stub Area: A area the does not allow the propagation of type 5 LSAs. A default route is injected as a type 3 LSA by the ABR.
  • Totally Stubby Area: A area that does not allow the propagation of type 3, 4, and 5 LSAs. Only exception is the default route injected by the ABR as a type 3 LSA.
  • NSSA Area: A area that does not allow type 5 LSAs. External routes are injected as type 7 LSAs. No default route is injected without additional configuration. Default route injected is an type 7 LSA.  Area <#> nssa Default-information originate
  • Totally NSSA Area: A area that does not allow type 3&5 LSAs. External routes are injected as type 7 LSAs. A default route is injected as a type 3 LSA by the ABR.  

Authentication:

OSPF supports four types of authentication:

  • None: no authentication used
  • Clear text: clear text passwords used
  • MD5: Uses MD5 algorithm to hash password
  • SHA: Uses SHA algorithm with key-chain to hash password

Note: IOS 15.4(1) supports the extended SHA-HMAC (RFC 5709)

Default-Route:

The OSPF router command default-information originate will propagate a default route through the OSPF domain. Without the keyword always, a default route must be present in the routing table.

The default route is advertised as an external type-2.

Path Preference:

OSPF uses cost, reached by calculating bandwidth along a path. That is the primary decision in factoring the shortest path. As a loop prevention feature, OSPF also uses these criteria for path preference. Listed from most preferred to least:

  • Intra-area routes ( routes learned within the area )
  • Inter-area routes ( routes learned from another area)
  • External routes type-1 & type 2 ( routes redistributed from another routing domain)
  • NSSA routes type-1 & type 2 ( routes redistributed from NSSA area )

These path preferences do not account for cost.

Filtering:

Since OSPF is a link state protocol, all LSDB’s in an area have to be identical. A type 3 LSA can be filtered at the ABR, type 5 or type 7 can be filtered at the ASBR. Filtering on the local router is limited to the routing table.

-Note: To filter type 5 or 7 LSA’s not at the ASBR. You would need to use redistribution and filter the routes with a route-map. An example of this would be filtering a default route.

Summarizing:

Summarizing routes is also accomplished at the ABR & ASBR’s, which also allows for the non advertisement of routes. The biggest advantage of summarizing is smaller routing tables. Allowing for faster SPF calculations. The metric can either be designated or will be the lowest metric of the component routes.

     The last note to bring up is that all areas must connect to area 0. All traffic must traverse through area 0. So when creating an OSPF topology this must be taken into account. Using virtual links or GRE tunnels are band aid solutions to temporarily resolve connectivity issues caused by improper design.

As always thank you for your attention and time.

Cisco Device Management: Protocols & MPP

There are multiple protocols for device management on the Cisco platform. There is even a protocol for transferring images through the console cable (xmodem). In this post we will go over examples of utilizing these protocols. The goal is to understand our options when we want to access or transfer files to or from our devices. I will be using my usual setup of GNS3 with a connection to my network.

Telnet
Telnet utility allows users to test connectivity to remote machines and issue commands through the use of a keyboard.
It can be used to test open TCP ports on a device.
It requires a password be set on the line to login.
All communication is in clear text.
telnet towel.blinkenlights.nl <– found this

SSH

Used for secure device access, as well as file transfer.
Prerequisites:
Must configure hostname.
Must have username and password configured.
Must have domain name configured on device. Used in key generation.
Must have keys generated for secure connection
Must enable transport support on vty lines.
Router#ssh -l <username> -c <cipher> -m <hmac algorithm> -v <version> -p <port>
Login local or AAA configured on vty lines ( AAA by default applies login local to vty lines.)

Properly configured

debug ip ssh detail – line vty 0 4 configured with login cmd and password.

File Transfer
To copy files to/from your cisco device you would use the copy command.
Router#copy <source> <destination>

TFTP
Trivial file transfer protocol is a simplified version of ftp. It does not require authentication, no encryption is supported. tftp should only be used int your private network, not on any outside facing interfaces. A path is configured, devices can be pointed to it by your DHCP server if needed. They are extremely easy to setup. Files can be transferred with either the copy command or snmp. Successful transfer are displayed with a ! .
As far as Cisco device’s support as a tftp server, it is limited. It can only serve files for download. You cannot use this feature to upload files into the serving router’s local flash.

Router#snmp *set* {v1|v2c} <address> <community? [retries <n>] [timeout <seconds>] oid <object identifier> { integer | string | counter | gauge | ip-address} <value>

Router(config)#tftp-server <file path> <Access_list>

Router(config)#ip tftp source-interface < desired interface>

debug tftp packet

SCP
Prerequisites:
SSH enabled – scp utilizes ssh to securely transfer files
AAA new-model

AAA authentication and authorization properly configured
ip scp server enable

HTTP(S)

HTTP and HTTP can be used to copy files to/from remote server. HTTP uses TCP port 80 unencrypted, HTTPS uses TCP port 443 encrypted. The HTTP copy operation can use the embedded HTTPS client for HTTP Secure transfers, providing secure and authenticated file transfers within the context of a public key infrastructure (PKI).

FTP

FTP is a file transfer protocol, it has a secure version called sFTP. There are a plethora of servers available to deploy. On the client side we just need to present the server address, username and password.

MPP

Management plane policing is used to restrict on which interface, as well as which protocol packets the router will accept. It reduces the amount of ACLs needed for management traffic control. MPP silently drops packets and does not forward them to the cpu.

As always thank you for your time. Links will be at the bottom for your pursuit.

Links:

https://www.cisco.com/c/en/us/support/docs/security-vpn/secure-shell-ssh/4145-ssh.html
https://www.cisco.com/c/en/us/support/docs/ip/simple-network-management-protocol-snmp/7910-11-7910.html?referring_site=bodynav

https://community.cisco.com/t5/security-documents/guide-to-better-ssh-security/ta-p/3133344

https://www.cisco.com/c/en/us/td/docs/ios/security/configuration/guide/sec_mgmt_plane_prot.html

https://content.cisco.com/chapter.sjs?uri=/searchable/chapter/content/en/us/td/docs/ios-xml/ios/ifs/configuration/15-s/ifs-15-s-book/ifs-file-trans-http.html.xml

https://www.cisco.com/c/en/us/td/docs/ios-xml/ios/sys-image-mgmt/configuration/xe-3s/asr903/sysimgmgmt-xe-3s-asr903-book/sysimgmgmt-ftp.html

https://www.cisco.com/c/en/us/support/docs/ip/simple-network-management-protocol-snmp/7910-11-7910.html

https://www.cisco.com/c/en/us/support/docs/security-vpn/secure-shell-ssh/215450-copy-cisco-ios-images-from-pc-to-router.html

https://www.cisco.com/c/en/us/support/docs/security-vpn/secure-shell-ssh/4145-ssh.html

Linux ssh/scp to Cisco

sudo vi /etc/ssh/ssh_config

KexAlgorithms diffie-hellman-group-exchange-sha1,diffie-hellman-group14-sha1,diffie-hellman-group1-sha1

Ciphers aes128-cbc,3des-cbc,aes192-cbc,aes256-cbc

add to file for scp/ssh to cisco devices

Cisco Device Management: Local

Managing device authorization has more tools than I previously understood. Using a server is a great option but may not be for your situation. I will do a brief overview of setting up a router with privilege levels and views. I will try to keep the post digestible, while covering a nice amount of the topic. This will be brief explanation of configuration.

Configuration:

Privilege level 15 – upon login is at the privileged level 15 exec mode. No restriction on commands.

Privilege level 1 — Normal level on Telnet; includes all user-level commands at the router> prompt.

Login – configured line requires a configured password, will be met with error “Login required, password not set”

Logging synchronous – is used to synchronize unsolicited messages and debug output with solicited Cisco IOS  Software output. It is NOT a default. Exec-timeout 10 0 – by default, an IOS device will disconnect a console or VTY user after 10 minutes of inactivity. You can specify a different inactivity timer using the exec-timeout MINUTES SECONDS line mode command.

Router#configure terminal <–you can create system-wide resources for various system service, configure global behaviors, and enter specialized configuration modes.

Router(config)#host R1 <– changes device hostname

R1(config)#enable secret cisco123 <– is a command that allows setting a local password to control access to various privilege levels in global configuration mode. If you don’t specify a level it assumes level 15

R1(config)#enable secret level 7 jump

R1(config)#username mark privilege 7 secret green

R1(config)#username bob privilege 1 secret orange <– creates user with MD5 encrypted password. User will login at privilege level 1

R1(config)#username jan privilege 15 secret blue

R1(config)#privilege exec level 7 show running-config

R1(config)#privilege exec all level 7 debug <– This lowers the required privilege level to run all the debug commands to level 7. The all option includes all sub-commands

R1(config)#privilege exec level 7 show ip interface

R1(config)#privilege exec level 7 conf t

R1(config)#privilege interface all level 7 ip

R1(config)#line vty 0 4 <– Range of line to configure. Configuring individual lines is not recommended.

R1(config-line)#login local <– Login using local user database

R1(config-line)#logging synchronous

R1(config-line)#exec-timeout 10 0

R1(config-line)#absolute-timeout 10 <– terminates EXEC session after the specified timeout has expired in minutes

R1(config-line)#logout-warning 30 <– logout warning in seconds

R1(config-line)#privilege level 1 <– sets the level user will log into, default for vty lines is 1

R1(config-line)#transport input ssh <– allowed method to access vty lines

R1(config-line)#exit

R1(config)#line con 0

R1(config-line)#exec-timeout 30 0

R1(config-line)#privilege level 1 <– default for console line is 15

R1(config-line)#login local

R1(config-line)#exit

R1(config)#ip domain-name cisco <– sets domain-name, needed to generate rsa keys

R1(config)#no ip domain lookup <– disables dns lookup

R1(config)#crypto key generate rsa <– generates rsa keys used for ssh

R1(config)#interface fastEthernet 0/0 <– interface to configure

R1(config-if)#ip add 10.0.0.1 255.255.255.252 <– IPv4 address assigned to interface

R1(config-if)#no shutdown <– Interfaces are down by default, brings them up

R1(config-if)#exit

R1(config)#interface loopback 0 <– virtual interface that is always up

R1(config-if)#ip add 1.1.1.1 255.255.255.255

R1(config-if)#exit

    There is much to be desired as far as granularity goes for command authorization. That is where our next config comes in.

   Role-based CLI views provide granular control over administration.

Root View – equivalent to level 15 privilege, used to administer any view. The difference between a user who has level 15 privileges, and a root view user is that a root view user can configure a new view and add or remove commands from the view. Views are limited to the commands that have been added by the root view.

R1#enable view <– password is level 15 enable password

R1#conf t

R1(config)#aaa new-model

R1(config)#parser view <L1> <– creates view

R1(config-view)#secret <jump1>  <– assigns password to view

R1(config-view)#commands interface include ip add dhcp

R1(config-view)#commands interface include no shut

R1(config-view)#commands configure include interface

R1(config-view)#commands exec include configure terminal

R1(config-view)#commands configure include interface s0/0

R1(config-view)#commands configure exclude interface f0/0

R1(config-view)#commands exec include show running-config

R1(config-view)#commands exec exclude show startup-config

R1(config-view)#exit

R1(config)#exit R1#disable <– exit enable view mode, then use enable view <L1> to enter in view

Just amazing, I will links at the bottom for sources. This is something worth spending some time experimenting with. I fell in love with views when I realized I couldn’t limit certain commands with privilege levels. I could see these techniques utilized in a small environment, as long as proper documentation and change control were in place.

   Thank you for your time!!

Links:

https://searchitchannel.techtarget.com/feature/Configuring-privilege-levels

https://www.cisco.com/en/US/docs/ios/12_3t/12_3t7/feature/guide/gtclivws.html

https://learningnetwork.cisco.com/s/blogs/a0D3i000002eeWTEAY/cisco-ios-privilege-levels

Cisco Device Management: AAA Radius

In this post I will be going over the Radius configuration. A lot of it mirrors the Tacacs+ configuration. I will not go through server configuration. I only did that for Tacacs+ because of the limited options available. Radius has multiple options available, Windows Server NPS, Freeradius etc. Couple of key differences:

  • Radius uses UDP port 1812 for Authentication & Authorization.

UDP port 1813 for Accounting.

  • Supports EAP for 802.1x authentication
  • Cannot be used to authorize which cli commands can be executed or account cli commands

First things first.

–   aaa new-model check list:

–   enable secret <string>

–   username algorithm-type < sha254 or scrypt> secret <string>

–   crypto key generate rsa

Router(config)#aaa new-model

Router(config)#radius server RAD

Router(config-radius-server)# address ipv4 192.168.2.7 auth-port 1812 acct-port 1813

Router(config-radius-server)#key 0 <key>

Router(config)#aaa group server radius RADIUSMETHOD

Router(config-sg-radius)#server name RAD

Router(config-sg-radius)#ip radius source-interface g0/1

Router(config-sg-radius)#exit

Router(config)#aaa authentication login default group radius local

Router(config)#aaa accounting network default start-stop group radius

Router(config)#aaa accounting system default start-stop group radius

The configuration is simple enough. A few things to discuss. For command authorization you have two options, Tacacs+ server or local configuration. The Tacacs+ server option is less of an administrative burden. The local option has plenty of documentation. I will leave links at the bottom of this post. Privilege levels can be assigned to users and enable passwords. In the case of Radius defining the user privilege dictates which exec mode they are greeted with when authenticated. It’s still extremely useful authentication server. It can be used with 802.11 as well as 802.1x.

           Just like with the Tacacs+ configuration we want to make sure we define the server before attempting to add it to a group. Making sure the ports match on the server and the device. Here is a sample config of local command authorization.

The debug command was not explicitly permitted, so it is not able to be used at privilege level 7.   It’s a nice back up in case servers are unreachable, but I wouldn’t want local to be my only option.

Thank you for your time

-Notes

  • Use debug commands to assist troubleshooting configuration:

Debug aaa authentication

Debug aaa accounting

Debug radius accounting

Debug radius authentication

  • Use the test command to verify server functionality:

test aaa group radius server name <defined server> <username> <password> new-code

  • aaa authentication enable default <method1>  < method2>

^– Can be used to validate enable password by specified methods. Otherwise, it will use the locally defined password

Links:

https://community.cisco.com/t5/network-access-control/why-do-we-need-aaa-authentication-enable/td-p/2488836

https://www.cisco.com/c/en/us/td/docs/ios/sec_user_services/configuration/guide/12_4/sec_securing_user_services_12-4_book/sec_cfg_sec_4cli.html#wp1054774

https://www.cisco.com/c/en/us/td/docs/ios/sec_user_services/configuration/guide/12_4/sec_securing_user_services_12-4_book/sec_role_base_cli.html

https://community.cisco.com/t5/switching/enable-secret-level-password-command/td-p/1336399

https://www.cisco.com/c/en/us/support/docs/security-vpn/remote-authentication-dial-user-service-radius/13860-PRIV.html

https://wiki.freeradius.org/guide/Basic-configuration-HOWTO#define-a-user-and-password

https://community.cisco.com/t5/network-access-control/aaa-radius-and-privilege-levels/td-p/1683151

https://www.cisco.com/c/en/us/td/docs/ios-xml/ios/sec_usr_rad/configuration/15-mt/sec-usr-rad-15-mt-book/sec-rad-mult-udp-ports.html

Cisco Device Management: AAA Tacacs+

  • Authentication: Enables a user to be identified and verified prior to being granted access to a network devic and/or network services.
  • Authorization: Defines the access privileges and restrictions to be enforced for an authenticated user.
  • Accounting: Provides the ability to track and log user access, including user identities, start and stop times, and executed commands.

Tacacs+ – uses TCP port 49, open standard created by Cisco. It is mainly used for device access control. We will be installing it on Cent OS 7 and utilizing the service with a Cisco router.

Link to Cent OS official download site: https://www.centos.org/download/

Once you have your Cent OS 7 system up and running we will begin by downloading the Tac_plus application. Once at the terminal window we will enter:

cd /etc/yum.repos.d/

sudo vim tacacs-plus.repo

Press i to begin editing document.

:wq enter after you enter in this text:

[tacacs-plus]

name=Tacacs Plus

baseurl=http://li.nux.ro/download/nux/misc/el6/x86_64/

enabled=0

gpgcheck=1

gpgkey=http://li.nux.ro/download/nux/RPM-GPG-KEY-nux.ro

Next enter: sudo yum –enablerepo=tacacs-plus install tac_plus

When you copy and past it can mess up the — . I have experienced a few times.

Awesome, now we need to generate a password for our conf file.

Enter: tac_pwd

That will be pasted in the tac_plus.conf file.  We open with:

Sudo vi /etc/tac_plus.conf

#key = “ something “ change to

Key = “ Key ” Enter in the shared key for client devices

acl = default   { permit = 0\.0\.0\.0 <– enter the address that the device will use as source in packets sent to server.

} This is where the IP addresses of the client devices go.

Client Device = Routers, Switches, devices that will be contacting the server to authenticate users.

You can add new groups and users. Here is a example:

When we make changes to the program we want to restart the service.

sudo systemctl restart tac_pluc

sudo systemctl status tac_plus

Let’s not forget to add the firewall rules.  

sudo yum install firewalld -y

sudo systemctl status iptables
sudo systemctl stop iptables
sudo systemctl mask iptables

sudo firewall-cmd –get-zones

sudo firewall-cmd –get-default-zone

sudo firewall-cmd –list-all-zones

sudo firewall-cmd –set-default-zone=internal

sudo firewall-cmd –get-default-zone

sudo firewall-cmd –get-zone-of-interface=eth0 <– Put your interface here, enter < ip a > at terminal

sudo firewall-cmd –get-icmptypes

sudo firewall-cmd –get-services

cd /usr/lib/firewalld/services/
ls <– to view services available

cd /etc/firewalld/services/

sudo cp /usr/lib/firewalld/services/ssh.xml /etc/firewalld/services/tac_plus.xmlcd /etc/firewalld/services/tac_plus.xml ^– used to copy ssh.xml to tac_plus.xml

sudo vi /etc/firewalld/services/tac_plus.xml <– edit service xml


You don’t need to change description. The protocol- TCP and port- 49 are a must. The name is very useful.


sudo firewall-cmd –reload

sudo firewall-cmd –state

firewall-cmd –get-active-zones

firewall-cmd –get-service

Once we verify the port is open, we will configure our device to connect.

The commands:

Router(config)#aaa new-model

– enables aaa on device. By default, lines will use login local until a default method list is defined or a user defined method list is applied to the lines.  Best practice to make a user account before issuing this command. To lessen the likely hood of locking yourself out of device.

  • aaa new-model check list:
    • enable secret <string>
    • username algorithm-type < sha254 or scrypt> secret <string> <– may not be supported depending on your IOS version
    • username < username> secret <string>
    • crypto key generate rsa <– we want a key size of 1024 or above , then enter to defaults

Router(config)#tacacs-server 192.168.2.10 key <Key> <- Shared key

  • The servers need to be defined before being added to a group.
  • Theses are by default part of the Tacacs+ group of servers after being defined.  

Router(config) aaa group server tacacs+ <TAC>

Router(config-sg-tacacs+)#server 192.168.2.10

Router(config-sg-tacacs+)#exit

Router(config)#aaa authentication login default group <TAC> Local

  • Default is the method list that will be called upon when the service needs to know which database to match against.
  • TAC is the user defined group that will be used first for authentication. Local is the local database on the device that will be used second if the first method cannot be contacted.

Since we used the default method list the lines should be good to go. To view what is happening lets enter in some debug commands.

Router#debug aaa authentication

Router#debug aaa authorization  Let’s try: I will use telnet to myself.

Debugs are super useful in troubleshooting as well as learning. Use with caution, they can cause a RPE (resume producing event).

This user shouldn’t be privilege lvl 15. It shows we didn’t define a method list for authorization.

  • AAA authorization exec enables EXEC shell authorization for all lines except the console line.
  • AAA authorization console – Authorization for the console is disabled by default to prevent inexperienced users from locking themselves out.
  • Privilege level 0 – includes disable, enable, exit, help and logout.
  • Privilege level 1 – also known as User Exec mode. No configuration changes.
  • Privilege level 15: Privileged EXEC mode. Highest privilege level.
  • Privilege level 2-14 – can be configured to provide customized access control. ( either local or on server)
  • When all the AAA servers are unreachable AAA command authorization might still be trying to reach the servers. This will prevent users from being able to execute any more commands. Safety measure use the if-authenticated method. Allows all commands to be authorized as long as the user has successfully authenticated locally.

Router(config)#aaa authorization exec default group tacacs+ if-authenticated

After entering that command, let’s test the functionality.

Since we defined allowed commands and privilege level to the group. Added the user to the group (on the server). We have restricted the users commands on the device from the server. We can also enable accounting very easily too.

Router(config)#aaa accounting exec default Tacacs+

Router(config)#aaa accounting commands 15 default start-stop group tacacs+

The log file location is in the tac_plus.conf file at the very top.

You have to define the privilege level you will be accounting.

Show commands:

show run | section username|aaa|line|tacacs

-NOTES

  1. Do not allow the global enable password to be compromised. It will grant lvl 15 to users. Enable passwords for lower levels can be designated. Replace 15 with desired level. In a different post we will configure enable passwords of different levels. To utilize the enable passoword on the server. you would configure aaa authentication enable default group tacacs+
  1. Troubleshooting Notes:
  2. Check that server ip address is defined correctly on device.
  3. Check that the secret matches on server and device
  4. Check that you can connect to device via tcp port 49

c.1. You may have to install telnet

c.2. Telnet only works on tcp

  1. Sudo systemctl status tac_plus -l

Sudo journalctl -xe

  • aaa authorization config-commands is enabled with aaa authorization exec command
  • aaa authorization commands <priv level> { default | user defined list} – authorized all commands with the AAA server before executing them. Applied on a per-privilege level basis. A command authorization method list must be defined for every privilege level that requires command authorization.
  • If the aaa authorization commands level method command is enabled, all commands, including configuration commands, are authorized by authentication, authorization, and accounting (AAA) using the method specified. Because there are configuration commands that are identical to some EXEC-level commands, there can be some confusion in the authorization process. Using the no aaa authorization config-commands command stops the network access server from attempting configuration command authorization.
    • Examples

The following example specifies that TACACS+           authorization   is    run for level 15 commands and that AAA authorization of configuration commands is disabled:

 aaa new-model

aaa authorization command 15 group tacacs+ none

no aaa authorization config-commands

  • If the aaa new-model command has been configured to enable the AAA access control model, the no aaa authorization console command is the default, and the authorization that is configured on the console line will always succeed. If you do not want the default, you need to configure the aaa authorization console command.

User defined method lists must be applied to the lines to be used by device. We used the default list in this lab. Verify the line is configured with sh run | s line

Links to sources:

Install Configure Tacacs+ CentOS 7 RHEL 7 | Tech Space KH

How to Set Up a Firewall with FirewallD on CentOS 7 | Linuxize

https://www.cisco.com/c/en/us/td/docs/ios-xml/ios/sec_usr_tacacs/configuration/xe-16/sec-usr-tacacs-xe-16-book/sec-cfg-tacacs.html

https://www.cisco.com/c/en/us/support/docs/security-vpn/terminal-access-controller-access-control-system-tacacs-/200467-Troubleshoot-TACACS-Authentication-Issue.html

Cisco Device Management: Console Connection

In this post I will be sharing notes on configuring a cisco device for use. By default, there is no authentication on line console 0. If you have received used gear you may have to do password recovery. Once all that is settled. The first step is to connect to the device using a console cable.

You may need to buy a serial-to-usb adapter. USB console cables can be purchased from a plethora of online retailer. Depending on your pc you will need to find which COM port your device is connected to.

There are plenty of terminal emulation programs available. I use putty, find the tool that fits your needs.

Once we are connected, we will be met with a screen.

No is the correct answer here.

Now we can begin configuration. You can choose whichever hostname you want to give the device as well as username. Here is a example configuration.

Router> Enable

Router# configuration terminal

Router(config)# hostname < choose a name>

<chosen name>(config)#ip domain-name <choose a name>

<chosen name>(config)#no ip domain-lookup

We will configure encrypted passwords, as well as ssh. The short is if someone is eavesdropping on our traffic. We don’t want them to get out passwords.

<chosen name>(config)#username < chosen username> algorithm-type <scrypt or sha256> secret < desired password>

<chosen name>(config)#crypto key generate rsa modulus 2048

Hit enter unless you want to designate different options.

<chosen name>(config)#line con 0

<chosen name>(config-line)#login local

<chosen name>(config-line)#exec-timeout 30 0

<chosen name>(config-line)#logging synchronous

<chosen name>(config-line)#transport output ssh

<chosen name>(config-line)#exit

<chosen name>(config)#line vty 0 4

<chosen name>(config-line)#login local

<chosen name>(config-line)#transport input ssh

<chosen name>(config-line)#transport output ssh

<chosen name>(config-line)#exit

<chosen name>(config)#enable secret <enable password here>

The enable password will be used to gain access to the device. It is independent of the username password. Without the enable password you will not be able to login through the vty lines.

<chosen name>(config)#interface loopback 0

<chosen name>(config-if)#ip add 1.1.1.1 255.255.255.255

Loopback interfaces are automatically brought up

<chosen name>(config-if)# exit

<chosen name>(config)#end

<chosen name>#write memory

Building configuration…

  [OK]

<chosen name># show running-config

This command will show the current running configuration.

<chosen name># show startup-config

This command will show the startup-config. It will verify if our config saved.

Now to login to our device. The first prompt for a password, type in your username password. The second prompt for a password, type in your enable password.

<chosen name>#ssh -l <chosen username> 1.1.1.1

<chosen name># show users

-Notes

  1. Password Types
    1. 0 = unencrypted passwords ex- enable password < >
    1. 5 = MD5 algorithm preferred over 7 ex- enable secret
    1. 7 = Cisco Vigener cipher (weak) ex- service password-encryption
    1. 8 = Password-Based Key Derivation Function 2-PBKDF2 SHA256 consider uncrackable ex- username < > algorithm-type sha256
    1. 9 = Scrypt algrotithm ex- username < > algrotithm-type scrypt
  2. Transport preferred – protocol that will be used when typing ip address in usermode ex – <chosen name>#1.1.1.1
  3. Line con 0 transport output – protocol allowed from console ex-

4. You can change the source address for transport protocols with:

Router(config)#ip ssh source-interface <interface with configured ip address you want to use>

Router(config)#ip telnet source-interface <interface with configured ip address you want to use>

Thank you for your time.