Managing device authorization has more tools than I previously understood. Using a server is a great option but may not be for your situation. I will do a brief overview of setting up a router with privilege levels and views. I will try to keep the post digestible, while covering a nice amount of the topic. This will be brief explanation of configuration.
Configuration:

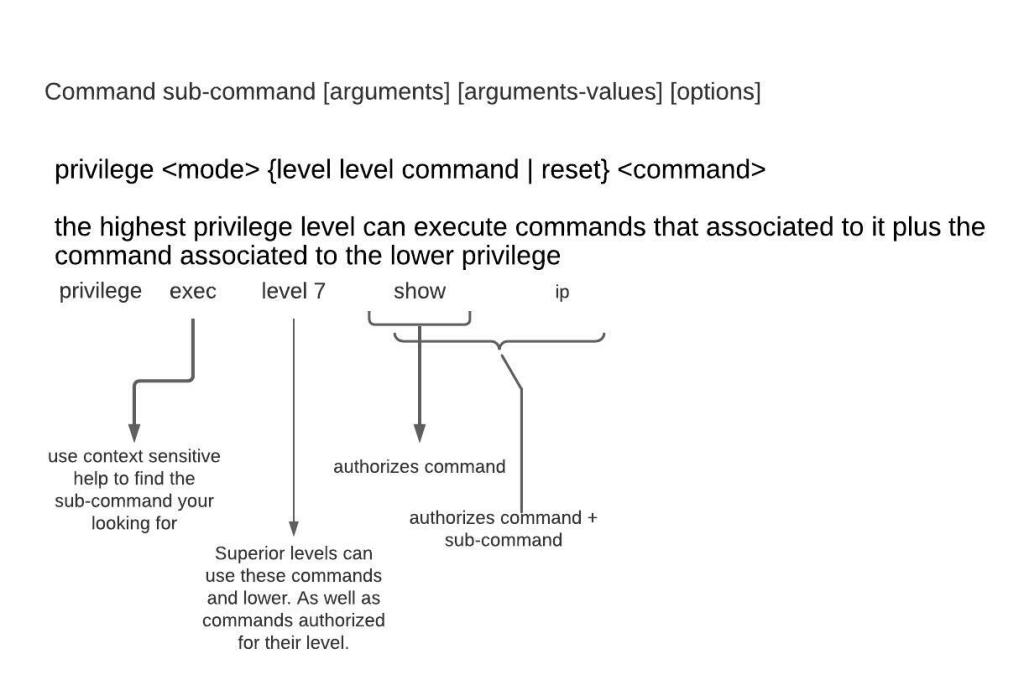
Privilege level 15 – upon login is at the privileged level 15 exec mode. No restriction on commands.
Privilege level 1 — Normal level on Telnet; includes all user-level commands at the router> prompt.
Login – configured line requires a configured password, will be met with error “Login required, password not set”
Logging synchronous – is used to synchronize unsolicited messages and debug output with solicited Cisco IOS Software output. It is NOT a default. Exec-timeout 10 0 – by default, an IOS device will disconnect a console or VTY user after 10 minutes of inactivity. You can specify a different inactivity timer using the exec-timeout MINUTES SECONDS line mode command.


Router#configure terminal <–you can create system-wide resources for various system service, configure global behaviors, and enter specialized configuration modes.
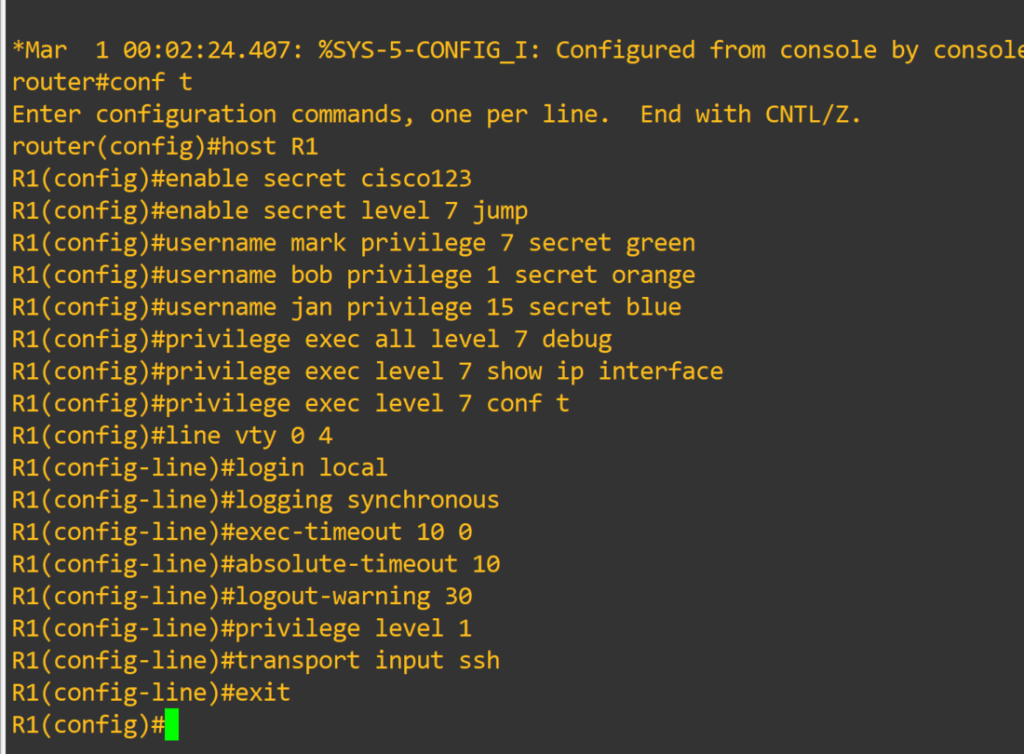
Router(config)#host R1 <– changes device hostname
R1(config)#enable secret cisco123 <– is a command that allows setting a local password to control access to various privilege levels in global configuration mode. If you don’t specify a level it assumes level 15
R1(config)#enable secret level 7 jump
R1(config)#username mark privilege 7 secret green
R1(config)#username bob privilege 1 secret orange <– creates user with MD5 encrypted password. User will login at privilege level 1
R1(config)#username jan privilege 15 secret blue
R1(config)#privilege exec level 7 show running-config
R1(config)#privilege exec all level 7 debug <– This lowers the required privilege level to run all the debug commands to level 7. The all option includes all sub-commands
R1(config)#privilege exec level 7 show ip interface
R1(config)#privilege exec level 7 conf t
R1(config)#privilege interface all level 7 ip
R1(config)#line vty 0 4 <– Range of line to configure. Configuring individual lines is not recommended.
R1(config-line)#login local <– Login using local user database
R1(config-line)#logging synchronous
R1(config-line)#exec-timeout 10 0
R1(config-line)#absolute-timeout 10 <– terminates EXEC session after the specified timeout has expired in minutes
R1(config-line)#logout-warning 30 <– logout warning in seconds
R1(config-line)#privilege level 1 <– sets the level user will log into, default for vty lines is 1
R1(config-line)#transport input ssh <– allowed method to access vty lines
R1(config-line)#exit
R1(config)#line con 0
R1(config-line)#exec-timeout 30 0
R1(config-line)#privilege level 1 <– default for console line is 15
R1(config-line)#login local
R1(config-line)#exit
R1(config)#ip domain-name cisco <– sets domain-name, needed to generate rsa keys
R1(config)#no ip domain lookup <– disables dns lookup
R1(config)#crypto key generate rsa <– generates rsa keys used for ssh
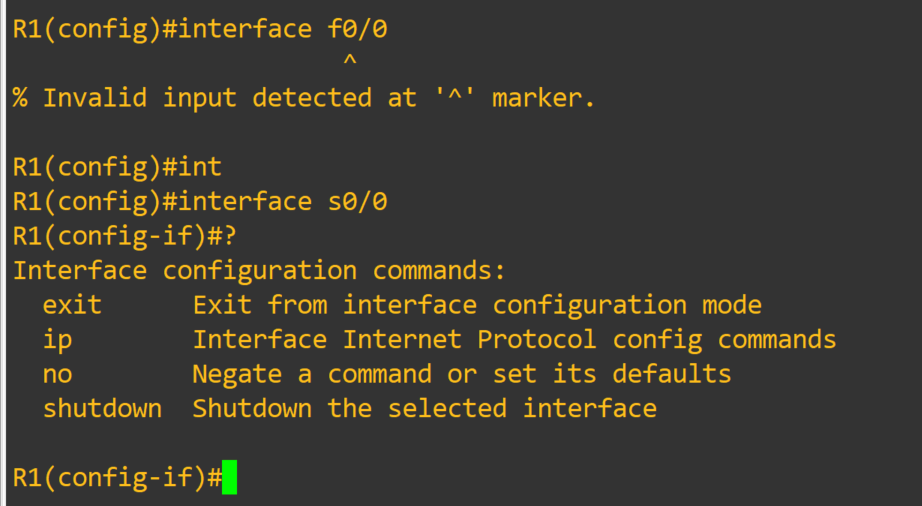
R1(config)#interface fastEthernet 0/0 <– interface to configure
R1(config-if)#ip add 10.0.0.1 255.255.255.252 <– IPv4 address assigned to interface
R1(config-if)#no shutdown <– Interfaces are down by default, brings them up
R1(config-if)#exit
R1(config)#interface loopback 0 <– virtual interface that is always up
R1(config-if)#ip add 1.1.1.1 255.255.255.255
R1(config-if)#exit
There is much to be desired as far as granularity goes for command authorization. That is where our next config comes in.
Role-based CLI views provide granular control over administration.
Root View – equivalent to level 15 privilege, used to administer any view. The difference between a user who has level 15 privileges, and a root view user is that a root view user can configure a new view and add or remove commands from the view. Views are limited to the commands that have been added by the root view.
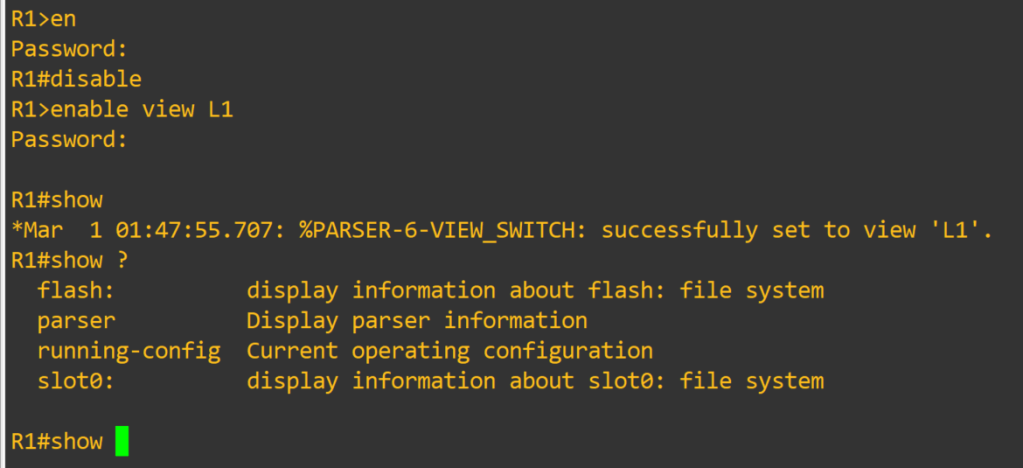
R1#enable view <– password is level 15 enable password
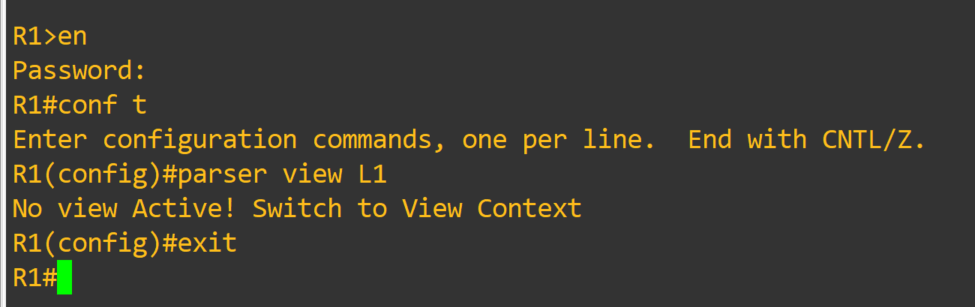
R1#conf t
R1(config)#aaa new-model
R1(config)#parser view <L1> <– creates view
R1(config-view)#secret <jump1> <– assigns password to view
R1(config-view)#commands interface include ip add dhcp
R1(config-view)#commands interface include no shut
R1(config-view)#commands configure include interface
R1(config-view)#commands exec include configure terminal
R1(config-view)#commands configure include interface s0/0
R1(config-view)#commands configure exclude interface f0/0
R1(config-view)#commands exec include show running-config
R1(config-view)#commands exec exclude show startup-config
R1(config-view)#exit
R1(config)#exit R1#disable <– exit enable view mode, then use enable view <L1> to enter in view

Just amazing, I will links at the bottom for sources. This is something worth spending some time experimenting with. I fell in love with views when I realized I couldn’t limit certain commands with privilege levels. I could see these techniques utilized in a small environment, as long as proper documentation and change control were in place.
Thank you for your time!!
Links:
https://searchitchannel.techtarget.com/feature/Configuring-privilege-levels
https://www.cisco.com/en/US/docs/ios/12_3t/12_3t7/feature/guide/gtclivws.html
https://learningnetwork.cisco.com/s/blogs/a0D3i000002eeWTEAY/cisco-ios-privilege-levels
